How To Seed data into firebase
This guide walks you through the process of seeding data that is provided by our team into your Firebase Firestore using a Node.js script. Prerequisites for this guide is that you have already setup a firebase console project and that you have Node.js and npm installed on your machine before you start.
If you find a folder named seed inside your firebase_folder/functions you can go to this section to learn how to seed the data.
Set Up a New Directory
Create a directory for your script by navigating to where you want to create this project and run commands:
mkdir firestore-import
cd firestore-import
Initialize a Node.js project:
npm init -y
This creates a package.json file.
Get Your Service Account from firebase
Head to the firebase console and download it
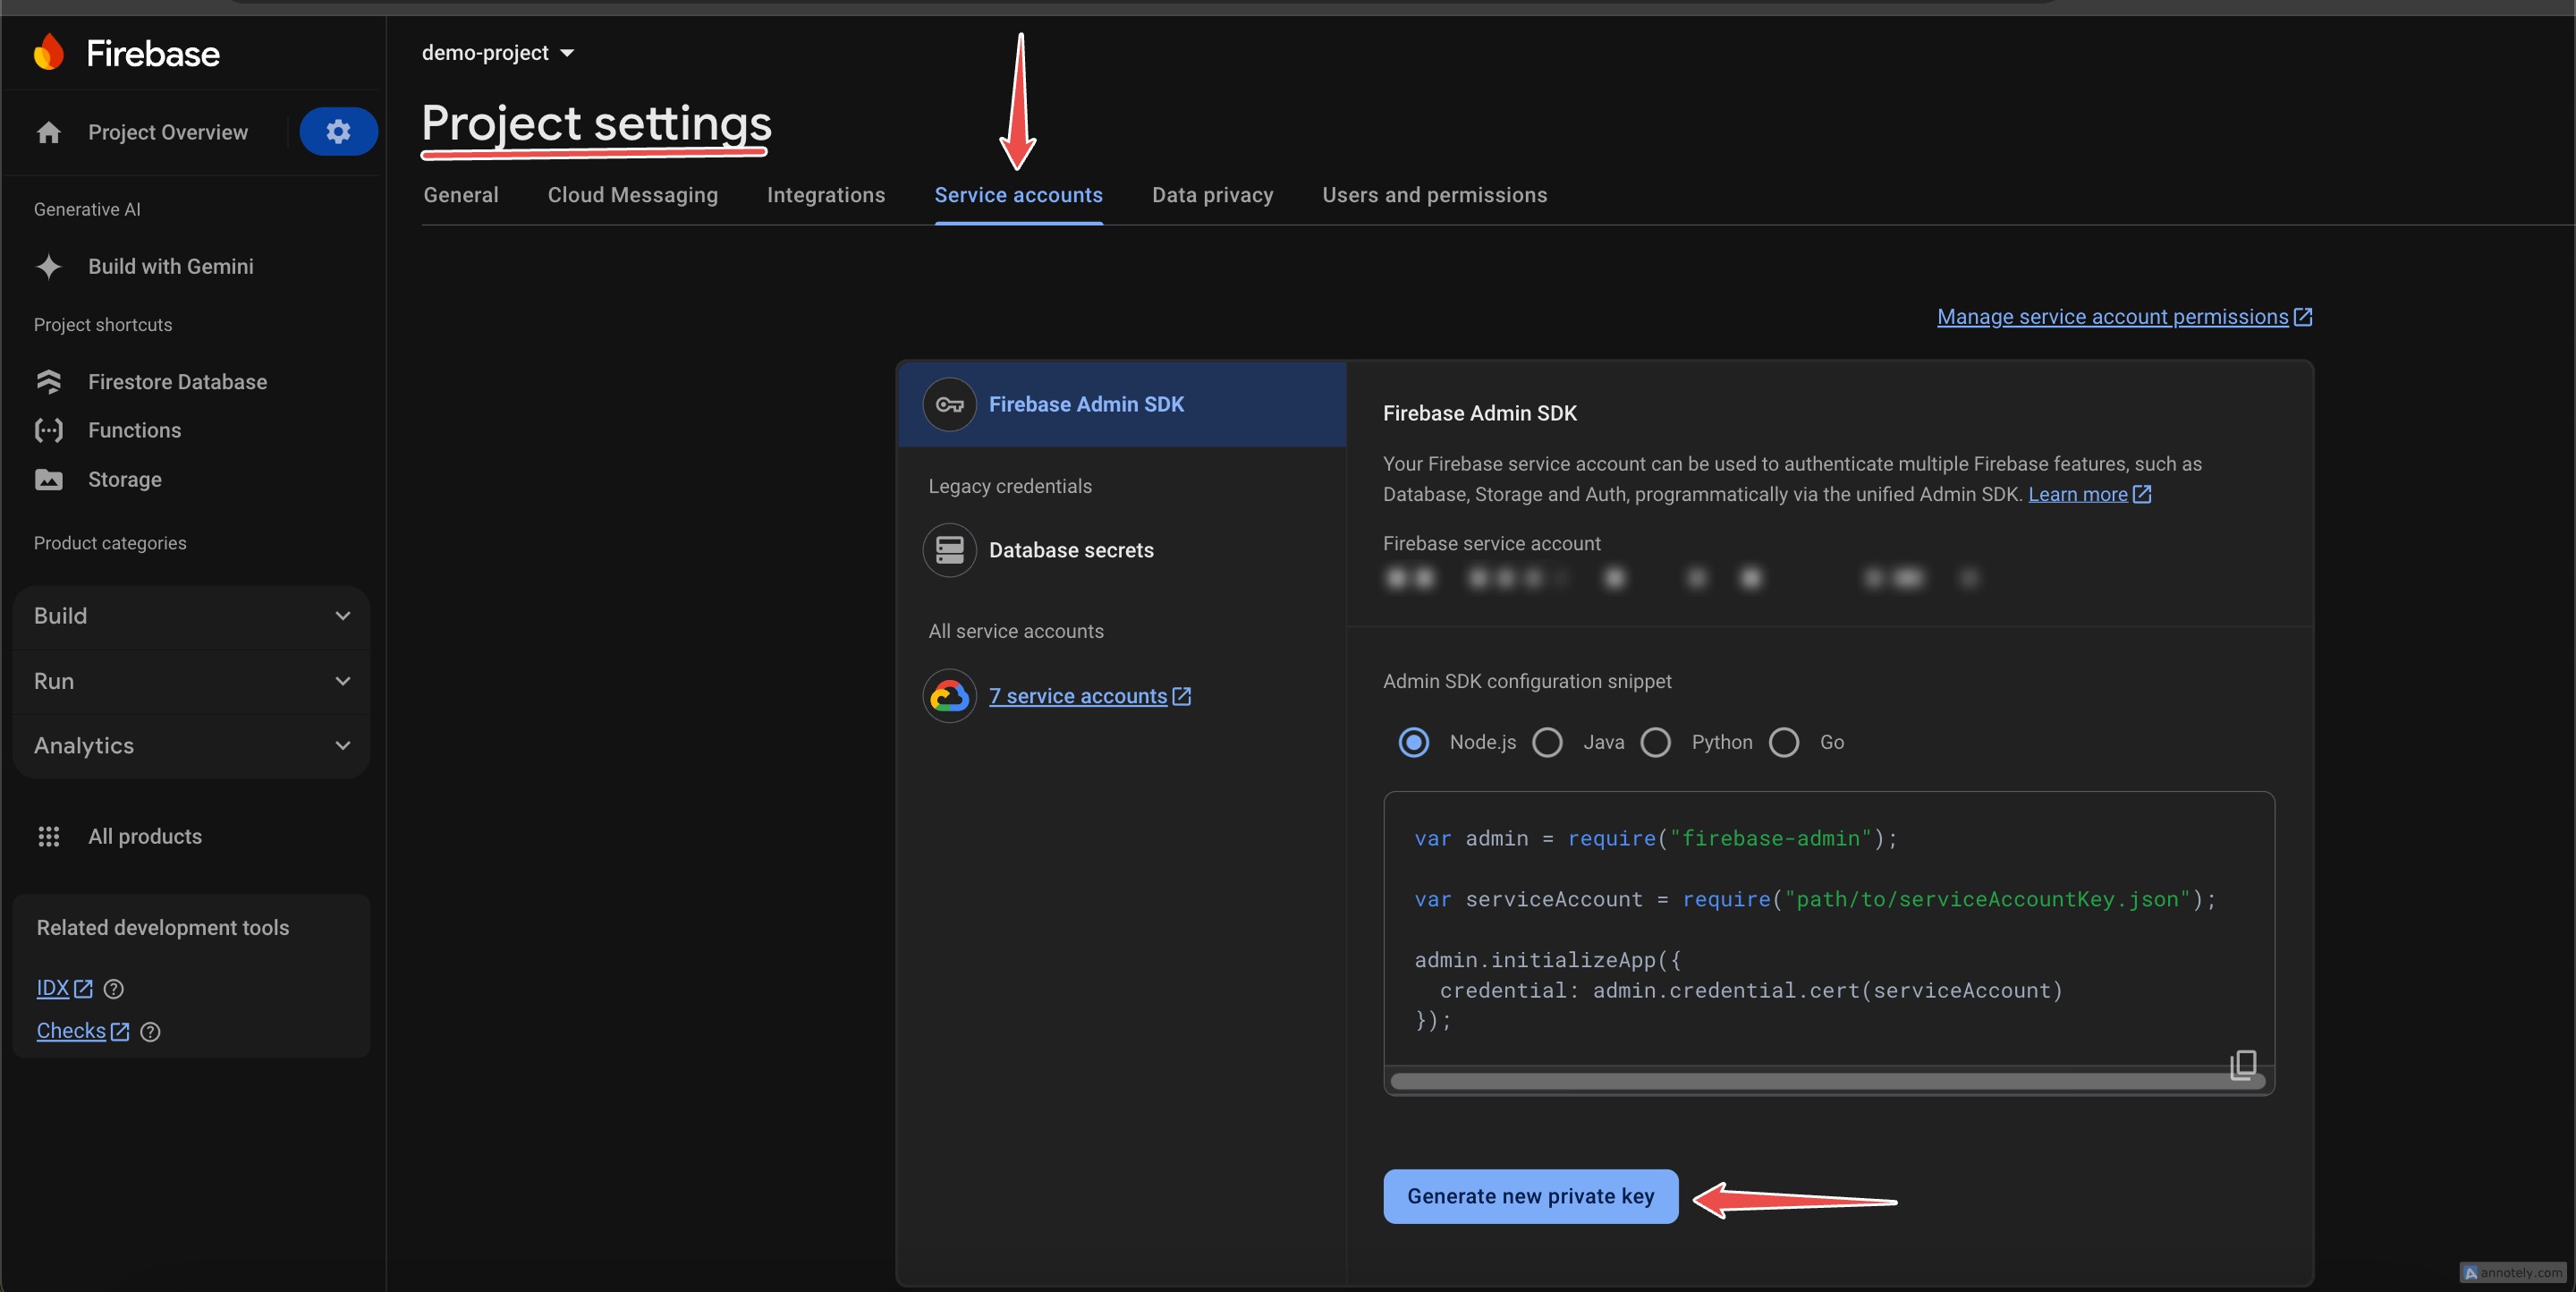
Rename this downloaded file to serviceAccountKey.json and put it in the root of the project we created above (firestore-import).
Import seed folder and Install dependency
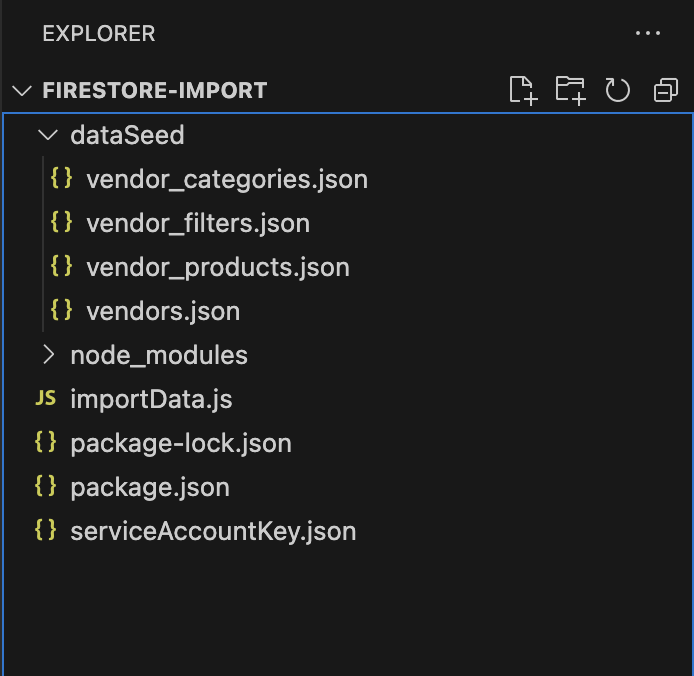
Next go ahead and import our seed folder. (usually name dataSeed having json files inside it). Next we will go ahead and add the npm package we need to seed our firebase.
- npm
- yarn
npm install firestore-export-import
yarn add firestore-export-import
Add final code that does the magic
Your almost there! finally create a file importData.js inside the root project and put the below code inside it.
const { initializeFirebaseApp, restore } = require('firestore-export-import');
const serviceAccount = require('./serviceAccountKey.json');
const path = require('path');

// Path to your JSON file
const jsonFilePath = path.resolve(__dirname, './dataSeed/vendors.json');

// Initialize Firebase
const firestore = initializeFirebaseApp(serviceAccount);

// Import data
restore(firestore, jsonFilePath)
  .then((status) => {
    console.log('Data imported successfully:', status);
  })
  .catch((error) => {
    console.error('Error importing data:', error);
  });
At this point you should have a project looking like:
Final Command
Great, your done setting up the project! Final commands left to run would be:
node importData.js
You should see message Data imported successfully: { status: true, message: 'Collection successfully imported!} in terminal.
Go ahead and change the code line inside your importData.js file and change the json file name to the other files we have included inside the dataSeed folder:
const jsonFilePath = path.resolve(__dirname, './dataSeed/vendor_product.json'); // now to seed the other collection
and run command node importData.js for each file inside the dataSeed folder we have included.
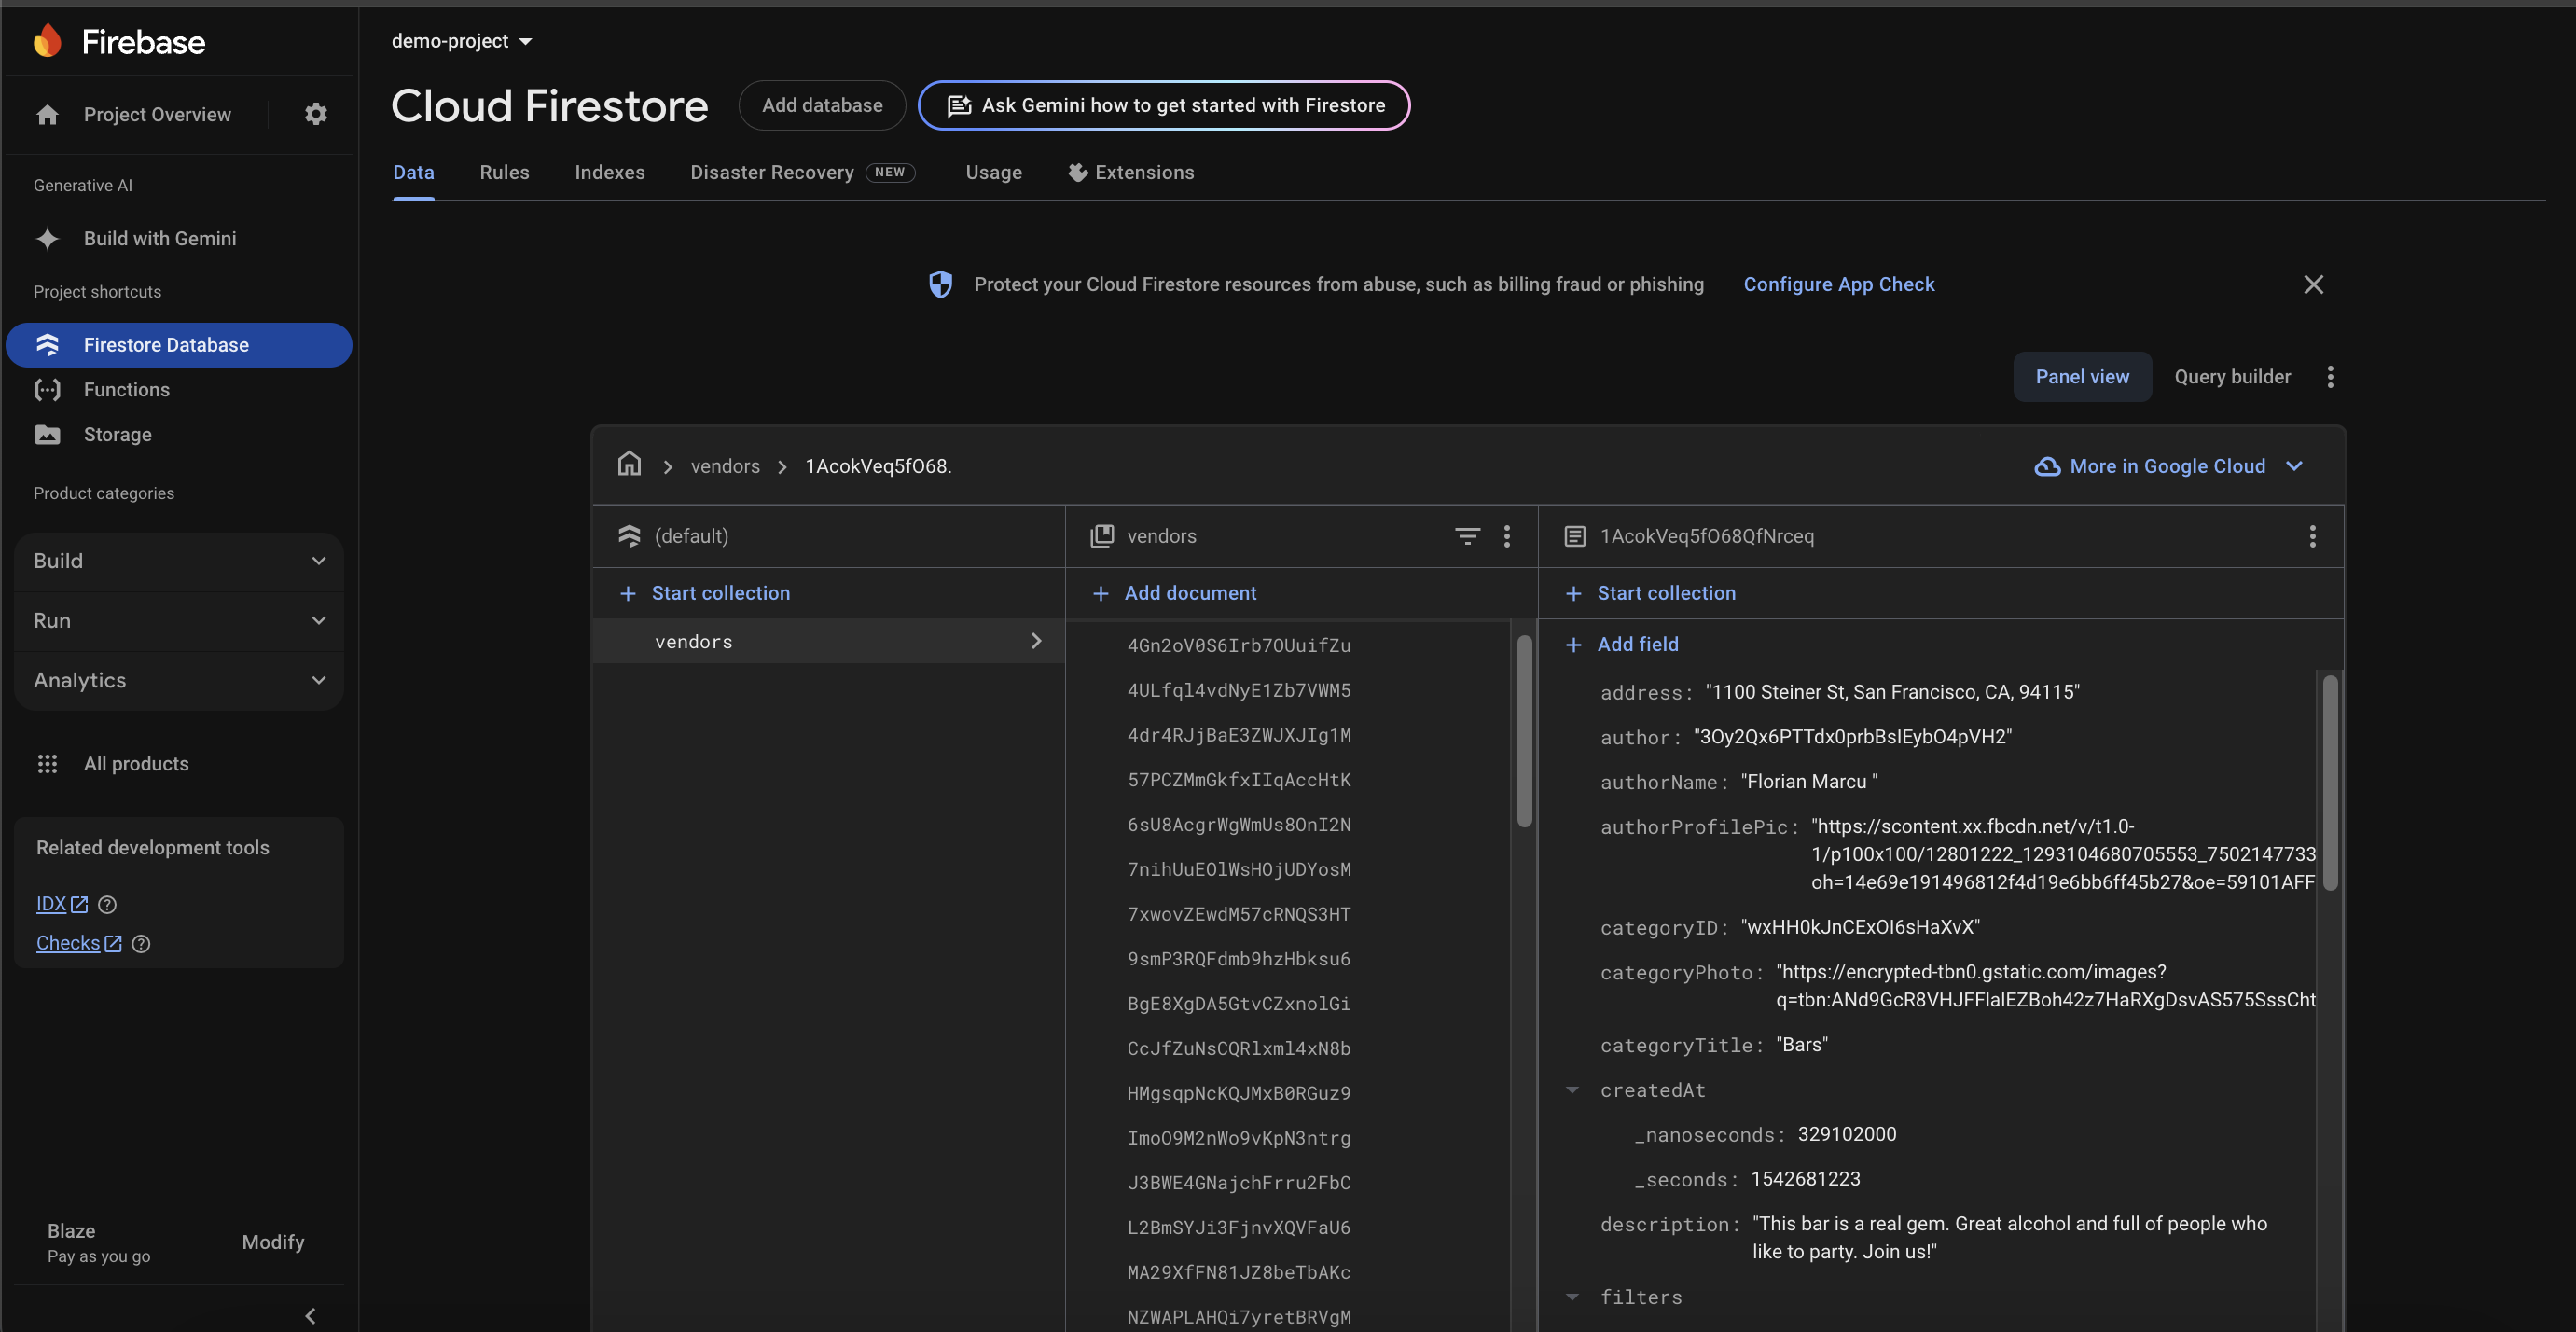
Great Job! You have sucessfully seeded your firebase with our seed data. Go ahead to your firestore to see the imported datas. You should find new data inserted:
Congratulations! You have successfully set up your project and seeded your Firebase Firestore with data provided by our team.
Seeding your Firebase using a Firebase Function
If you navigate to your firebase_directory/functions/seed/dbSeed.js folder, you'll find a seed function that can be deployed to Firebase. Inside your dbSeed.js of the firebase, head to the bottom of the file and change the line to your project name as well:
const deleteCollection = async collectionPath => {
  await tools.firestore.delete(collectionPath, {
    project: 'fir-project-e56c1', // your firebase project Id here
    recursive: true,
    yes: true,
    force: true,
  })
}
Next, after deploying your Firebase functions following our deployment guide here:. If you head to the Functions inside your firebase console, you'll see the function URL in your Firebase Console.
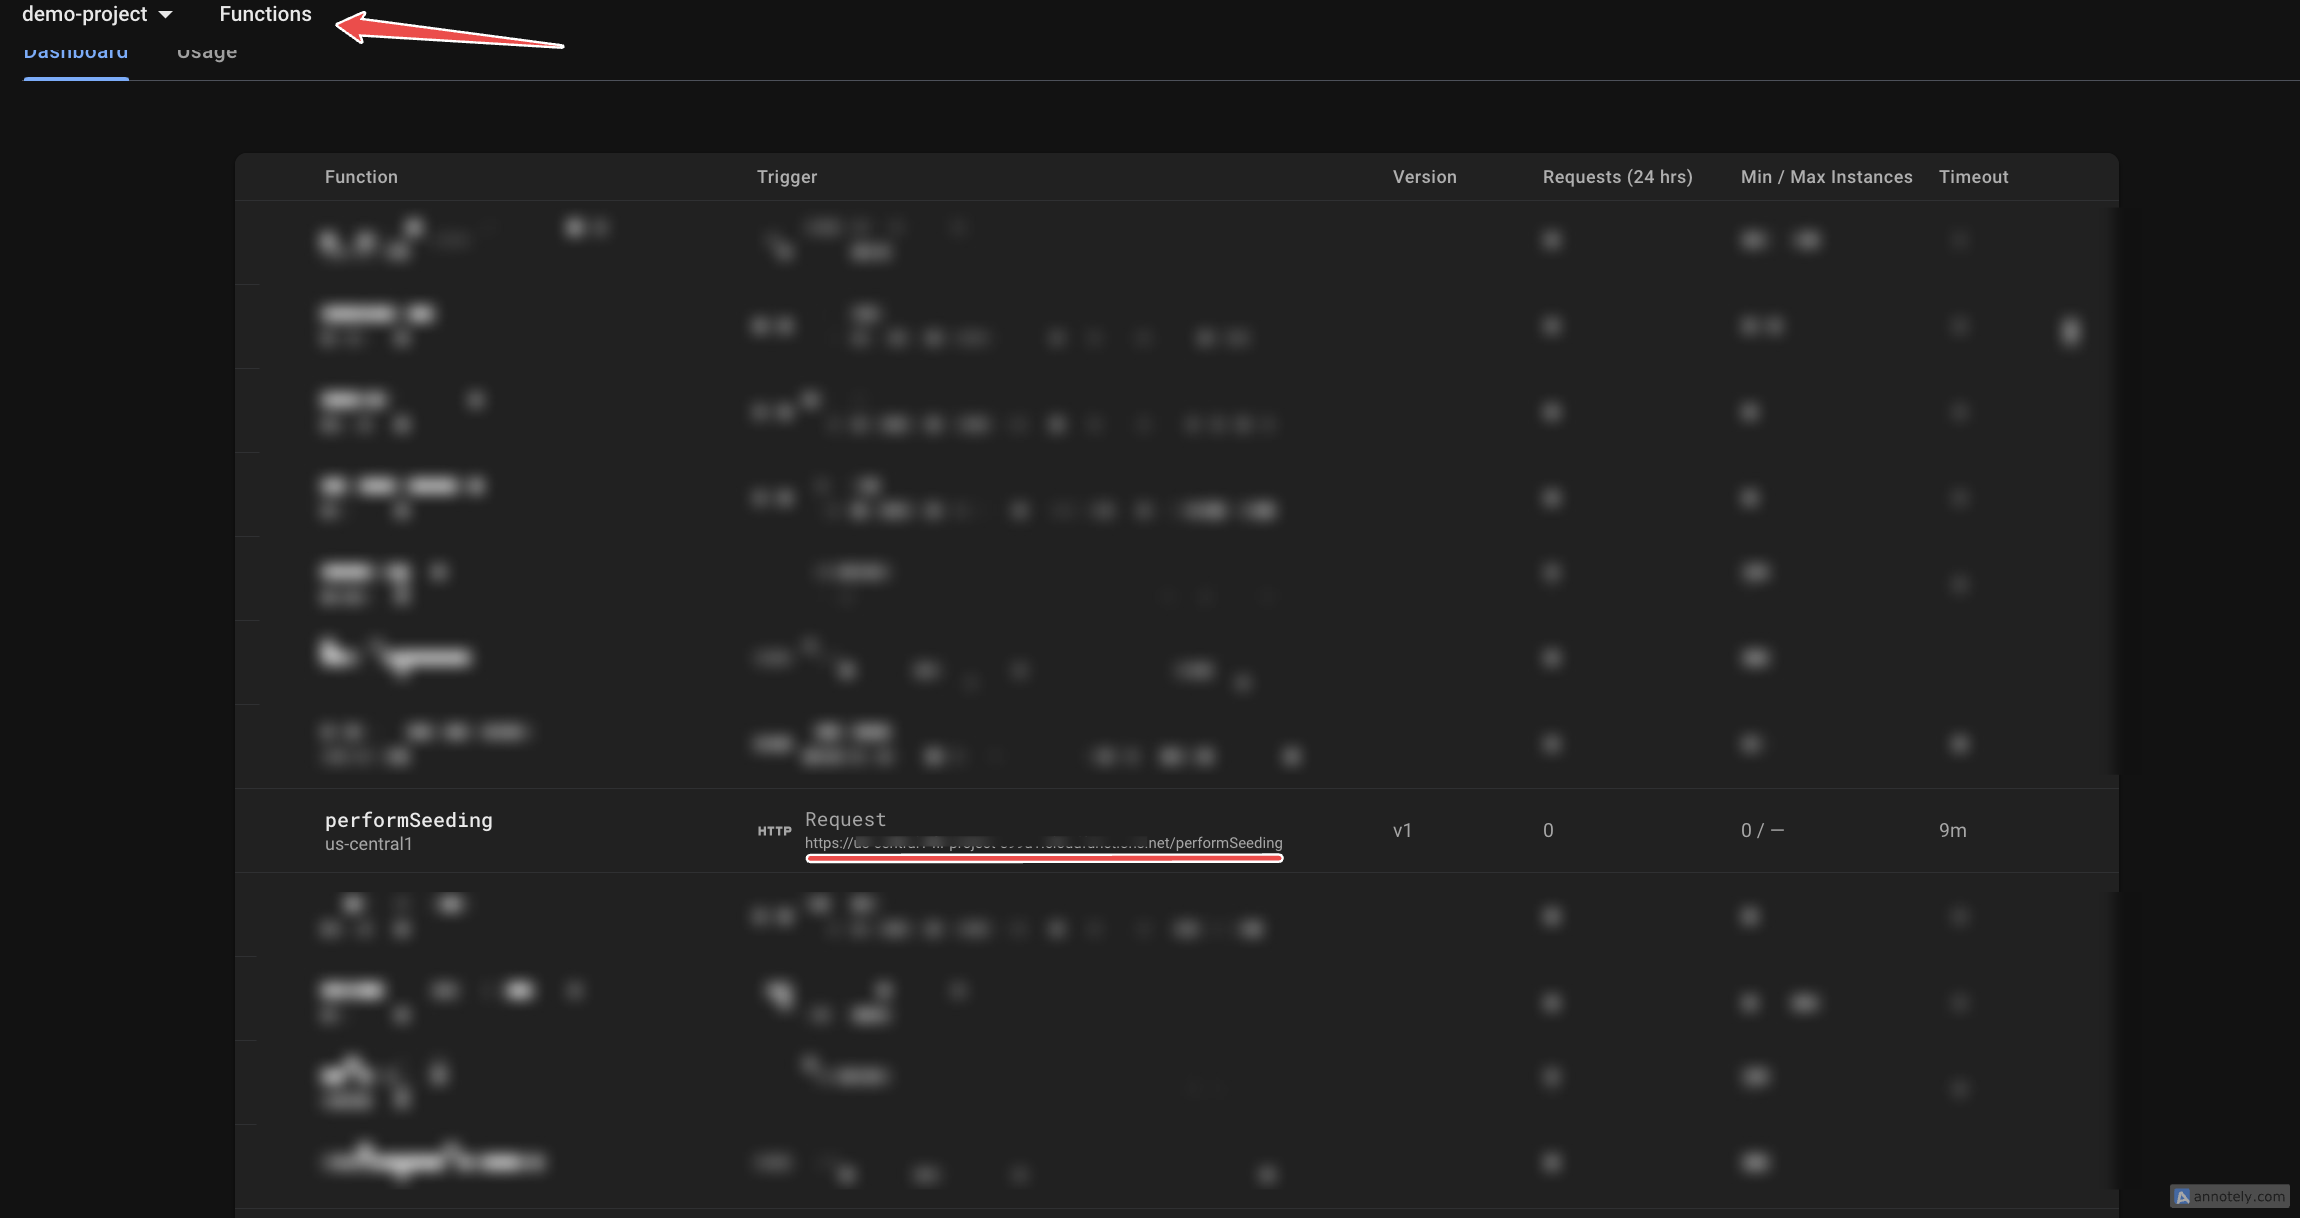
To use this seeding function, you'll need an authentication token. Here's how to obtain it:
-
First, locate the file
authClient.jsin your project:<your_instamobile_product>/src/core/onboarding/api/firebase/authClient.js -
Modify the
loginWithEmailAndPasswordmethod by adding the token logging line:
export const loginWithEmailAndPassword = async (email, password) => {
return new Promise(function (resolve, reject) {
 auth()
   .signInWithEmailAndPassword(email, password)
   .then(async response => {
     const uid = response.user.uid

     const tokenn = await response.user.getIdToken();
     console.log("Your Auth Token is: ", tokenn) // Add this line to get your token
     const userData = {
       email,
       id: uid,
     }
     usersRef
       .doc(uid)
       .get()
       .then(function (firestoreDocument) {
         if (!firestoreDocument.exists) {
           // User does not exist anymore in users collection, but it exists in Auth, so we create a new one
           usersRef.doc(uid).set(userData, { merge: true })
           resolve({
             user: { ...userData },
             warning:
               "Your account has been previously removed automatically, so now it's incomplete.",
             errorCode: ErrorCode.noUser,
           })
           return
         }
         const user = firestoreDocument.data()
         const newUserData = {
           ...userData,
           ...user,
         }
         resolve({ user: newUserData })
       })
       .catch(function (_error) {
         console.log('_error:', _error)
         resolve({ error: ErrorCode.serverError })
       })
   })
   .catch(error => {
     console.log('error:', error)
     var errorCode = ErrorCode.serverError
     switch (error.code) {
       case 'auth/wrong-password':
         errorCode = ErrorCode.invalidPassword
         break
       case 'auth/network-request-failed':
         errorCode = ErrorCode.serverError
         break
       case 'auth/user-not-found':
         errorCode = ErrorCode.noUser
         break
       default:
         errorCode = ErrorCode.serverError
     }
     resolve({ error: errorCode })
   })
})
}
After logging in as a user, you should see your authentication token in the console: Your Auth Token is: [your-token]
Making the Seed Request
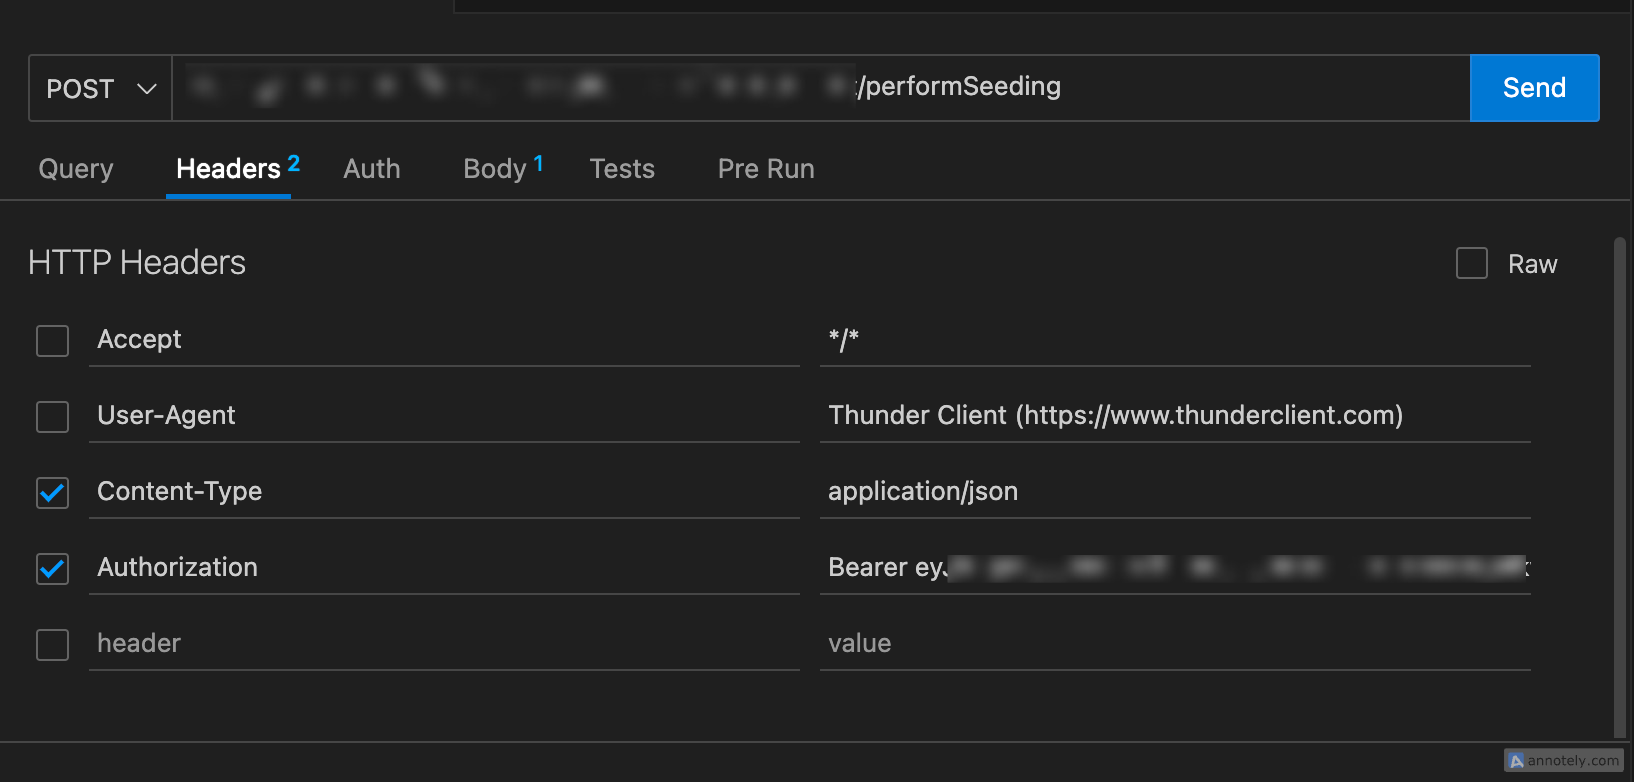
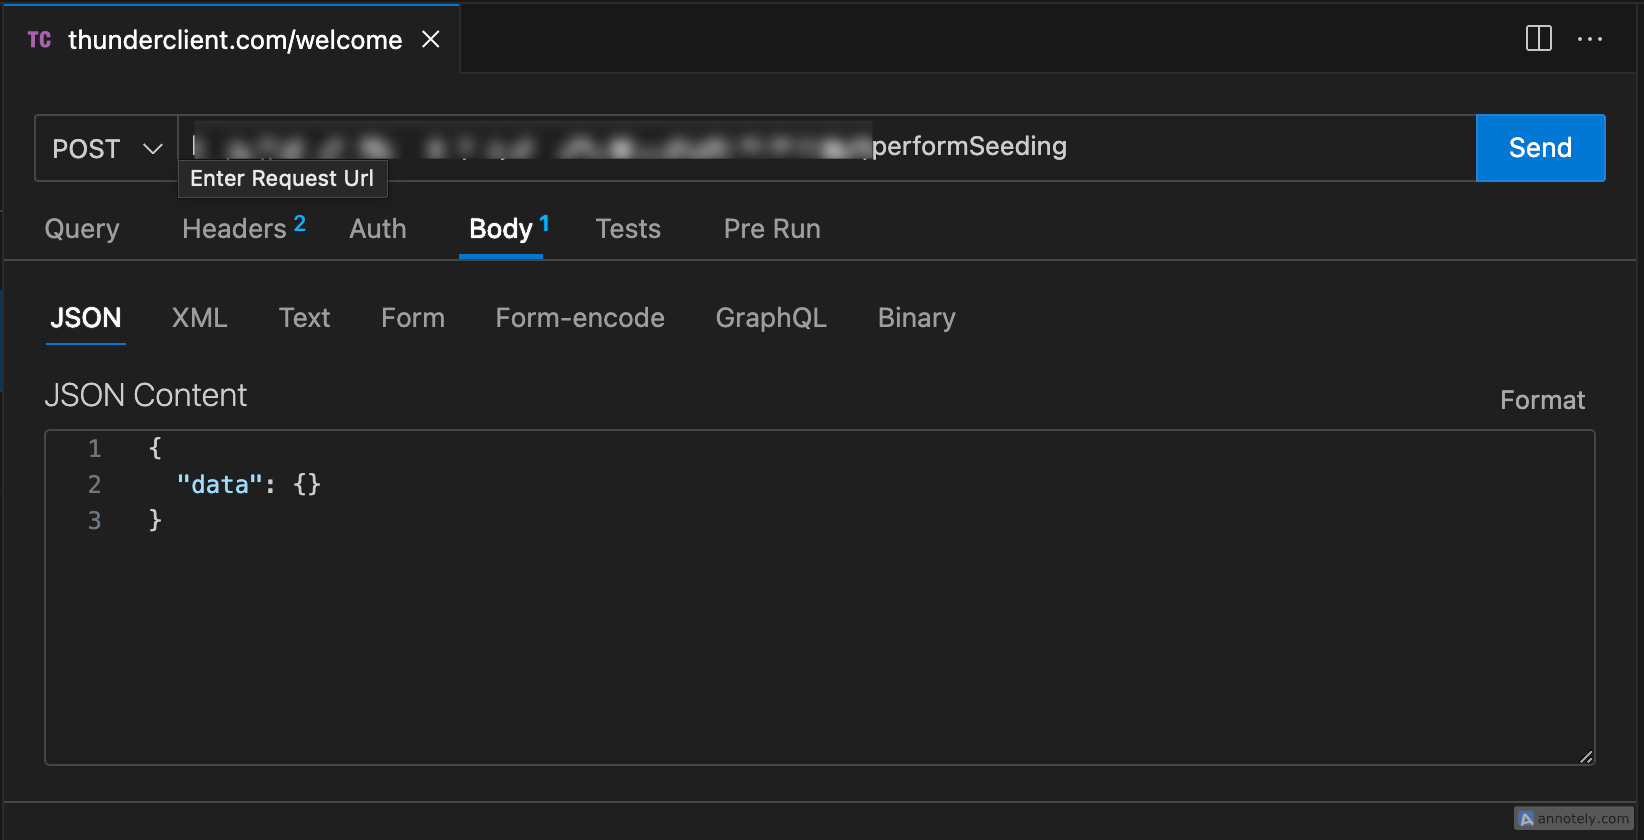
With your authentication token and function URL, you can now make the seeding request using any API client like (Postman, Insomnia, or VS Code's Thunder Client):
- Set the request method to POST
- Use your Firebase Function URL - You copied above
- Add the following JSON in the request body:
{
  "data": {}
}
- Add Authorization Header (your token that was logged in the console above)
Here's how your request should look:
Great! now you should see your users populated in your firestore database.